Hey all, so i'm back in Zbrush after a bit of a break playing with Unity.
I've been following some tutorial videos on CGSociety by Byran Wynia.  He uses an interesting concept called 'Thumb Nailing' which basically involves speed sculpting three ideas in Zbrush then using photoshop to paint over so you ultimately are left with 20 or so thumb nail images of potential designs. I really like this idea and I hope I can come up with some cool concepts.

I'm going with the idea of an 'Alien host' I want to make something really confronting and shocking. So far I've completed 2 sculpts and I'm excited to do the third.

Heres a quick look at the speed sculpts so far!


Lately I've been spending a lot of time working on a Unity3D project, not only from a texturing and modelling point of view but also from a software coding point of view. Its been years since I actually wrote any decent code but I must say I still remember quite a bit and I've managed to pick up a lot of C# in Unity really quickly.

I'm currently pro-typing my own game, possibly for a mobile platform, if I can get something to a state that I'm happy with I will approach a few of my software developer mates and see if we can take it all the way.

But in the mean time here is a little sample of a low viking character I created for the unity project.

Low Poly Viking


Hand Painted Texture


After finishing my goblin project, which was all about high-res detail and epic render times, i've turned my attention back to low poly work for a Unity 3D project I'm working on.

I'll definitely get back to the high res stuff soon though as I have an idea in mind for my next project! But for now i'm working on a simple low poly character, i'm again tackling the hand painted textures, which is the biggest challenge for me.

But I'm always so impressed by how cool some of those textures can look. I'll post some WIP shots in a few days, but for now I want to leave you with this little gem I found!

You may note that in 3ds max when working with textures, they appear lower resolution in the view-port window. This isn't so bad when you are working on a rendered piece but if you are creating real-time art for a game engine you'll want to see your textures in high quality in the view port. This little max script lets you control it all via a handle little UI that you can make to a menu or keyboard short cut.

Nitrous Texture Tweaker 


I finally completed my goblin prison warden scene. This final render was constructed with Zbrush, 3DS Max, rendered with Vray and post processing in After Effects and Photoshop. The last few stages were a little bit rushed but I'm pretty happy with the final image. Full sized image here


Things are coming along quite nicely on this project, I've learnt SO much!! This test render actually marks quite a turning point in my creative development.
I have now ironed out my Zbrush to 3DS Max workflow. Displacement with Vray works really well if the settings are perfect!
I'll be sure to added some detailed information under the Learning section of this blog relating to displacement once i've finished this project.
So the scene and all the modelling is done! (minus) the eyes for my character.
From here i'll be experimenting further with rendering in Vray and moving onto textures and materials!

Still plugging away at my goblin prison project. I've now pretty much completed most of my Zbrush work for this phase and I'm happy to say I've finally bedded down my workflow of Zbrush to 3dsmax! This has taken a lot of time, experimenting reading etc, but I now have a method that can get great results in Vray for 3dsmax! Looking forward to some great renders!

As a side note I've read a lot of tutorials and posts stating that Zbrushs UV workflow doesn't yield good results, especially when using displacement maps. I must say I don't agree. At least in this project using UV master or even the AUVTiles has worked nicely, even with poly painted textures. Still, having said that, if you are painting textures in 2D say in photoshop then you'll need better UV layouts than the ones Zbrush generates.

So to show off my new workflow, here is some quick Vray renders of the goblins accessories, all using displacement maps on low poly meshes and also using poly painted textures.

Dagger in Sheath


Pants and Belt


Leather Shawl 


Leather Cap


Bone Pendant 


I've been experimenting a lot with Vray in 3DS Max, a renderer that I have not had much experience in. The main reason why I started looking at this render was I found an amazing site that has a perfect displacement from Zbrush to Vray workflow.

This area was a big unknown for me as I have never taken anything from zbrush into 3dsmax before, so I needed to bed down my workflow before I could fully commit to finalizing everything in zbrush.

The artist who put together this tutorial is Akin Bilgic and the workflow can be found here http://www.cggallery.com/tutorials/displacement/

He also has some really great work worth checking out.

So now i'm going on with creating the accessories for my goblin!

Heres some Vray test renders as well.

Vray Test Render - No displacement, lighting test


Vray Test Render - Subsurface Scattering and Displacement


Been a while between posts, but nothing new there. I've been working on a new project and I said this before but this time it is going to be a lengthy and more complex project. I'm not going to give too much away but I plan to render the final scene out in 3DS Max. I'll also sculpt some parts in Zbrush so there will be a big learning curve on the pipeline between the two systems,

I've been following some sculpting tutorials on Digital Tutors and I've pretty much completed the base sculpt which as I hope you can see is a goblin. 

I wanted this character to be frail and emaciated, as opposed to the typical bulky warrior type. I also wanted him to be old, which will hopefully set off the entire scene nicely.

Heres a few WIP shots then a test render of the naked goblin at the end.

Accessories and 3DS Max testing next!

Initial base mesh with minor sculpting


Some more sculpted details


Adding gums and teeth


More detail, sub div 4 here I think.


Base polypaint


ZBrush Render


Hi Readers.

I've completed my latest project! I've called it 'Cool Kitty' it is a stylized portrait of my own pet cat 'Axon' so the coloring's etc match his own.

I mainly started this project to learn more about the creation of hair and fur. Just like my last project this was rendered entirely in Zbrush and all the hair and fur was completed with Fibermesh!

So I haven't posted any WIP shots of this project so I'll string some together now on how the image was created.

WIP #1 - Base Mesh

This is the base mesh as it was stylized I didnt add too much detail here. I also new there was going to be a lot of fur. Looking at this now I think the arms are a little long.


WIP #2 - Posing

Heres where I was playing around with the pose. I wanted something that would express a certain 'feel' I looked at a bunch of images of people winking and cheesy poses. This was the final pose I came up with, but I wasn't sure what he would be leaning on at that point.


WIP #2 - Fibermesh

So the fibermesh ended up being about 5 separate sub-tools of varying length and style. I also used a lot of 3D layers to manage the styling. It was a lot of fun to work through this part. I must say though I found the 3D layers to be a bit buggy when working with fibermesh.


WIP #2 - More Fibermesh

This time more length just playing with it.


WIP #2 - Polypaint

So as with most projects containing something new for me I always find out a better way to do things down the track. If you polypaint the base mesh first the fibermesh will take on the colours underneath!! This would have saved a lot of time for me. But alas I had to paint multiple sub-tools to get the colours I wanted.


WIP #2 - Accessories
This was the process of creating the collar which I created using various 'Insert-multimesh' brushes. You can achieve some really cool results quickly with these brushes. There is a tonne of awesome free ones found here. http://www.zbrushcentral.com/showthread.php?170167-Insert-Multi-Mesh-Repository


I'll post some detail about post production in photoshop soon along with some of my own personal critique about the final image.

I'm back onto a new Zbrush project, this time I have I'm going for something more 'light-hearted' but primarily to learn more about Fibermesh. I'll post some WIP shots for this project soon.

In the meantime I found this great imagine depicting the 'Creative Process' I found it funny and a very true account of the woes of the artistic process.

Enjoy!


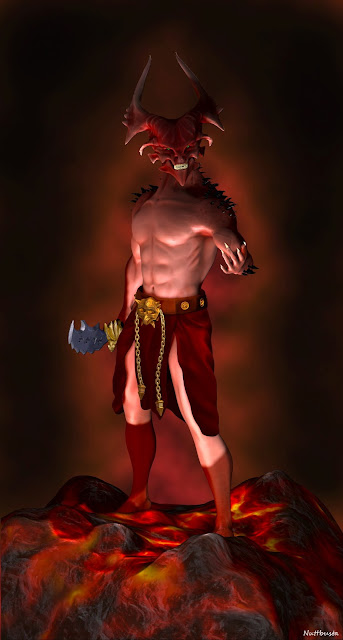
I have completed the first full render of my demon character with some minor post production in photoshop. I pretty happy with this final image and it was a lot of fun to create. Zbrush is definitely my application of choice right now. I've also posted a turntable of the sculpt below.


Demon Full Render #1


Zbrush Turntable


So i decided to go with a jagged sword for my demon character. This is really my first attempt and any hard surface modelling in zbrush. I originally started with a base mesh in 3ds max, but I ended up sculpting the whole thing in zbrush. It could definitely do with some more detailing but considering its really just an accessory, i'll leave it here.

I'm really having fun with this demon character! It was initially just going to be a learning piece but i've add a lot of my own flare to it and spent quite a few hours on it. I'm really loving zbrush now, it definitely has some frustrating points, i'm still not convinced the transpose tools are designed that well, but its become a lot easier and faster to work with.

Here is a couple of screenys from my latest work.


So onto the next project this time I have a 'grand plan' in mind which should hopefully bring many elements all together in one scene. I'm thinking BIG this time so it will take a while and no doubt I will learn a lot.

I plan to sculpt some characters in Zbrush so I've been working through some more tutorials and I must say I am loving this time around. Everything is coming together much faster and I am finding the tools easier to work with. My tablet is much more fluid to use now as well!

Here is WIP screen shot from my latest sculpt.


Demon Head WIP #1

After quite a few hours exploring various render setups to try and get decent render passes for my Bruton render I was up against a bit of a brick wall.

All of the rendered elements out of 3ds max were too dark, as if they had a gamma of 1.0 or less.

I was lucky enough to get a response from a user on the CG Society forums who explained that when rendering elements as a 32bit format such as .HDR or .EXR they need to output with gamma set to 1.0 whereas when rendering out 8bit or 16bit formats like .BMP or .JPG you need to have gamma set to 2.2 in 3ds max!

I also found .EXR is a great format in that it can contain all the render elements as separate layers in the single file! Very handy indeed, when compositing  in photoshop. However a plugin is required, called ProEXR

Heres a link to the forum post 

Heres a link to ProEXR
I finally got around to finishing off my Bruton project. I'm pretty happy with the end result however I am still having a lot of trouble with render passes in 3ds max so I didnt complete as much post production as I would have liked. I'm really happy how the lightning turned out in the end though

I learnt a lot about lighting in this project so I'm sure that will help a lot with future renders!

Heres the first render, i'll render out a few other shots once I can suss out the render passes properly.

Full resolution pic here 


Over the past month or so I've continued working with Unity3D or more specifically designing some low-poly characters for use in the Unity3D game engine.

Low poly modelling as its own challenges where I need to keep the total poly (triangles) down for best performance but still want to retain detail.

I've also learnt a massive amount over the past couple of months about hand painted textures, and I've definitely learnt a new respect for texture artists that achieve some amazing results through hand paint textures.

A great resource for all things 'game art' is www.polycount.com make sure you check out their wiki site if you are curious about any area of game art creation!

So below are a couple of screenshot! Proof i've still been doing something in the 3D art realm, even though my blog updates have been poor :P

On to rigging and animation of these characters next!

Low Poly Wizard ( Yes I know he's naked)


Hand Painted Wizard Texture


Low Poly Goblin


Hand Painted Goblin Texture


Its been a while since my last post (keeping a theme going there I think)

I have also been a little distracted from my Bruton project as I started exploring Unity 3D with the possible thought of creating a mobile game.

For those who are unaware Unity 3D is a development engine for 3D games and is particularly well known for success in the mobile game scene.

I've spent the last two weeks learning the basics of the Unity platform and more specifically how best to setup a pipeline between 3ds Max and Unity.

I have now created an animated character, with 3 animation clips built using the 3ds max biped system.

I then built a simple scene in Unity for the character and complied the project in the Unity web-player.

You can view my scene and the 3ds max character asset from the link below...

Unity 3D Web-player

I've been lucky enough to have the past couple of weeks off from my day job, so I was able to get in some good time with my 3D work! I have now completed the modelling for my Bruton project and I have also linked the model ready for posing.

I took my time with this model a lot more than I have done in the past, which resulted in me 'redoing' some sections of the model that I wasn't happy with. Its not perfect, but it is definitely the most complicated model I have created thus far!

Here are some WIP screenshots.

Head

Full Model


Test Pose


Its now onto UVW Unwrapping and texturing.

Next PostNewer Posts Previous PostOlder Posts Home